Approver resources
Travel and p-card
Learn how to approve in Concur
Travel requests, reimbursement requests, and p-card reconciliations are all sent through an approval process in Concur. As an approver, you’re responsible to make sure requests and reconciliations comply with policy.
Learn policy
Your responsibility as an approver is to make sure reimbursed expenses and p-card expenses comply with policy. Be sure you understand travel policy and p-card policy before approving requests or p-card reconciliations.

Approver training video
This video explains how to approve travel requests and reimbursement requests.

Approve a reimbursement request
This section guides you through approving a reimbursement request. Following these steps will help you finish your approval quickly, confidently, and correctly.
If you find expenses that don’t comply with travel policy, notify your executive director in writing. They’ll decide how the traveler can be reimbursed for those expenses.
If anything in the reimbursement request needs to be corrected, send it back to the traveler with a comment on what they need to change.

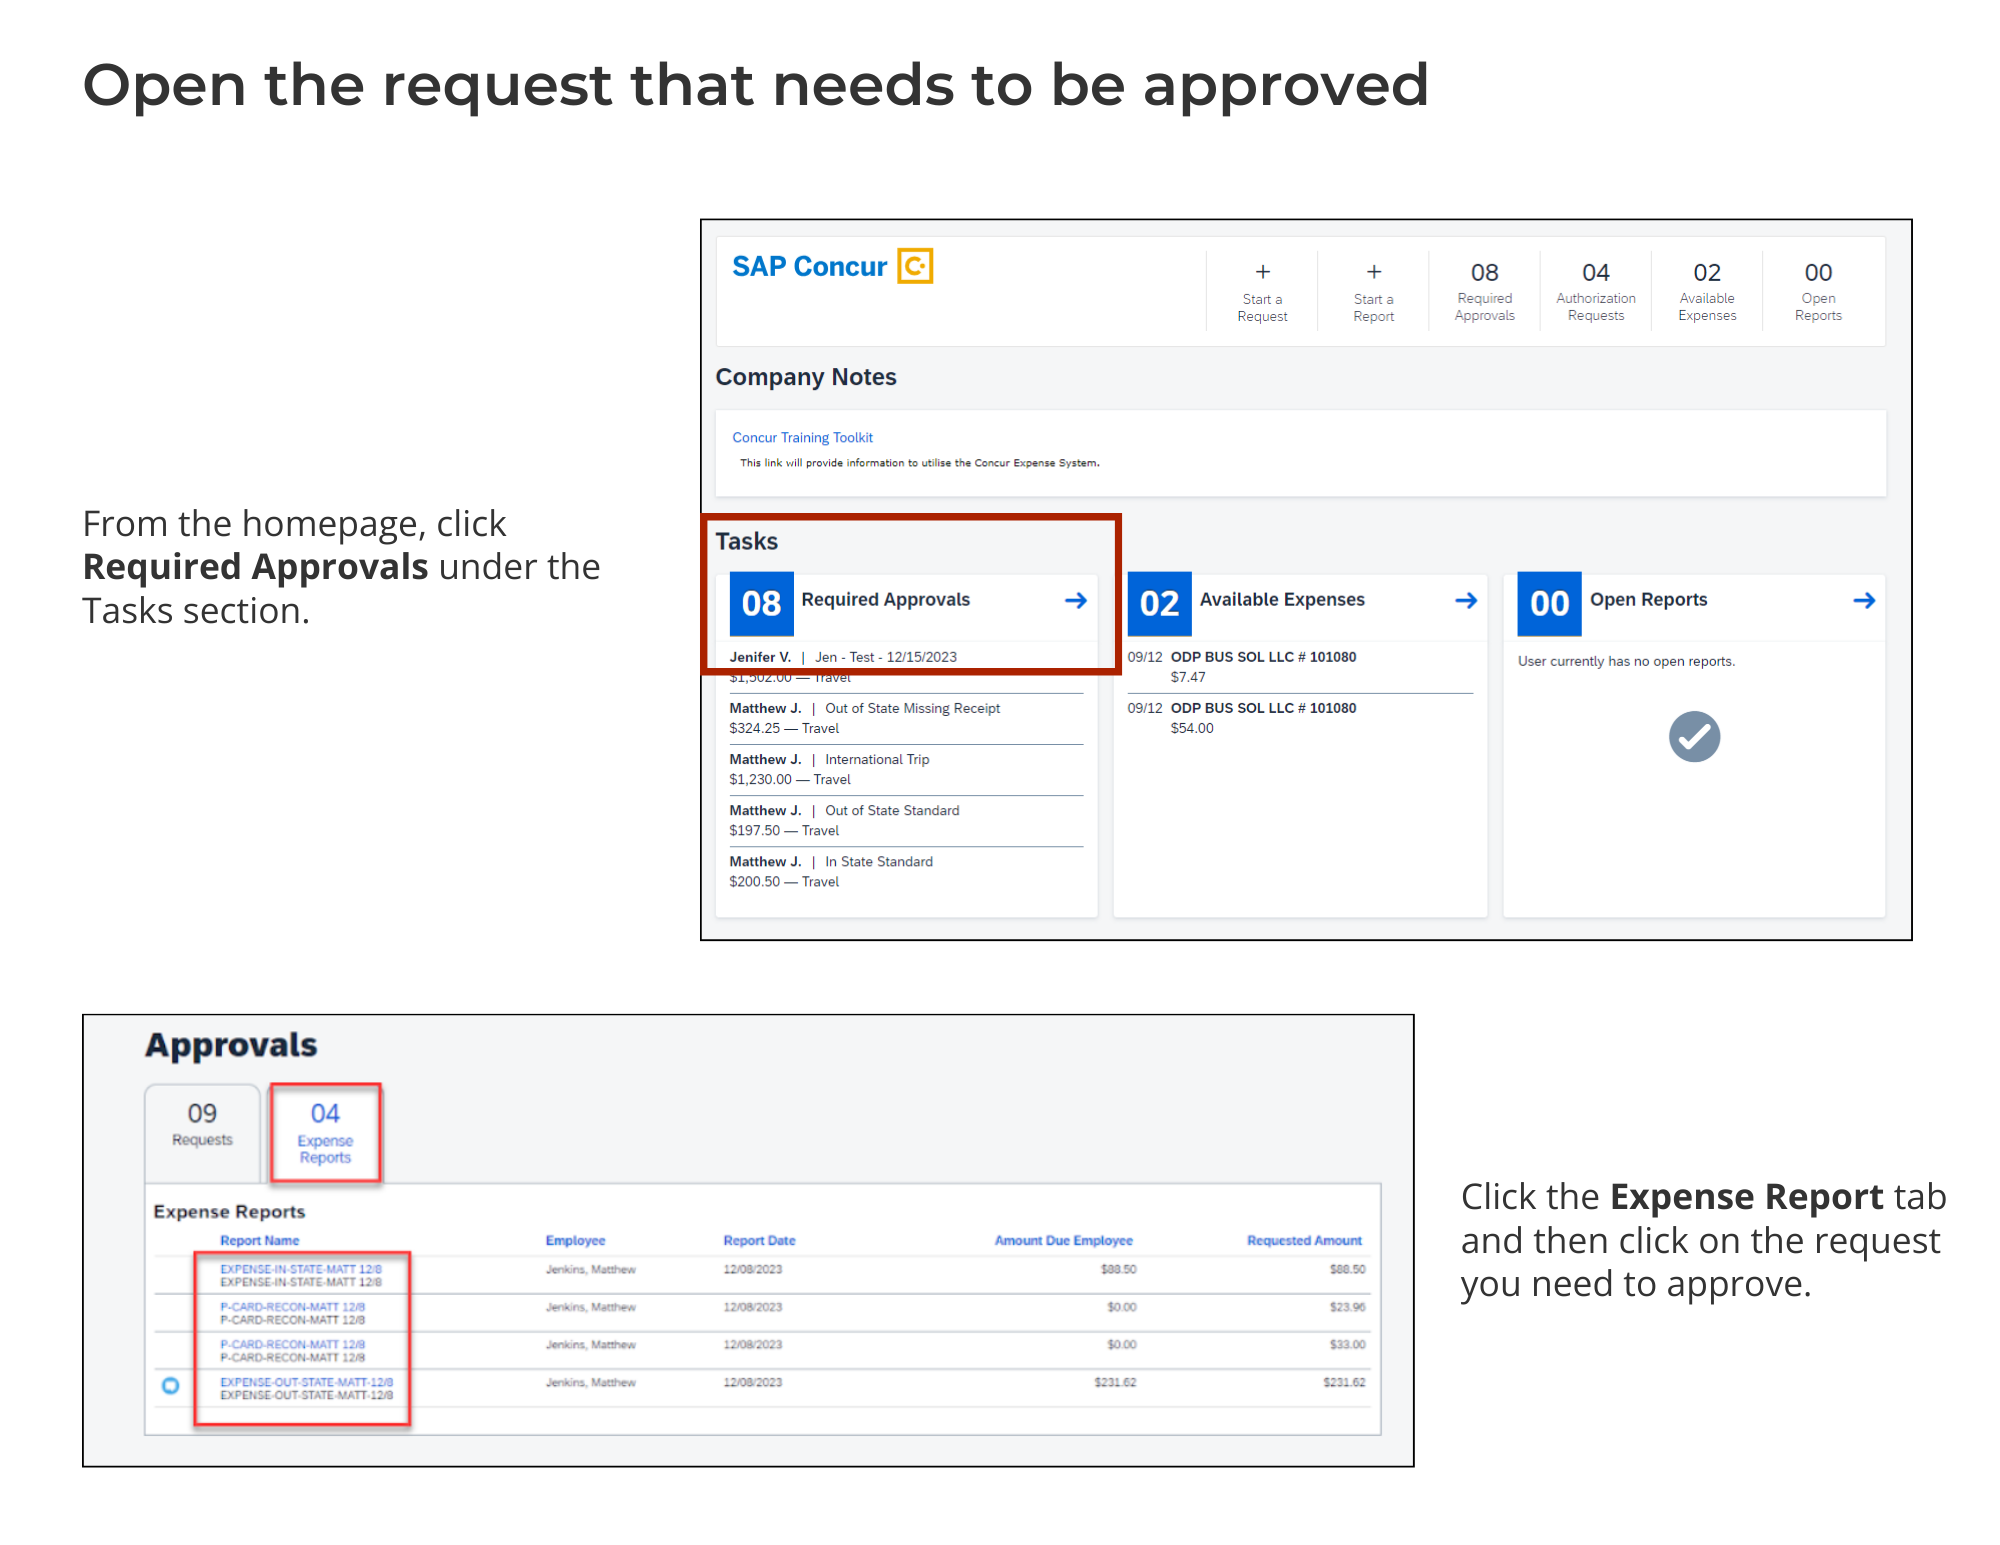
Open the request that needs to be approved
From the Concur homepage, click Required Approvals under the My Tasks section.
Click the Expense Report tab, and then click on the reimbursement request you want to approve.
You’re at the approvals summary page: it shows an overview of the reimbursement request. Now it's time to review the reimbursement request! Follow the steps below. Click the See image bars to see screenshots of Concur.
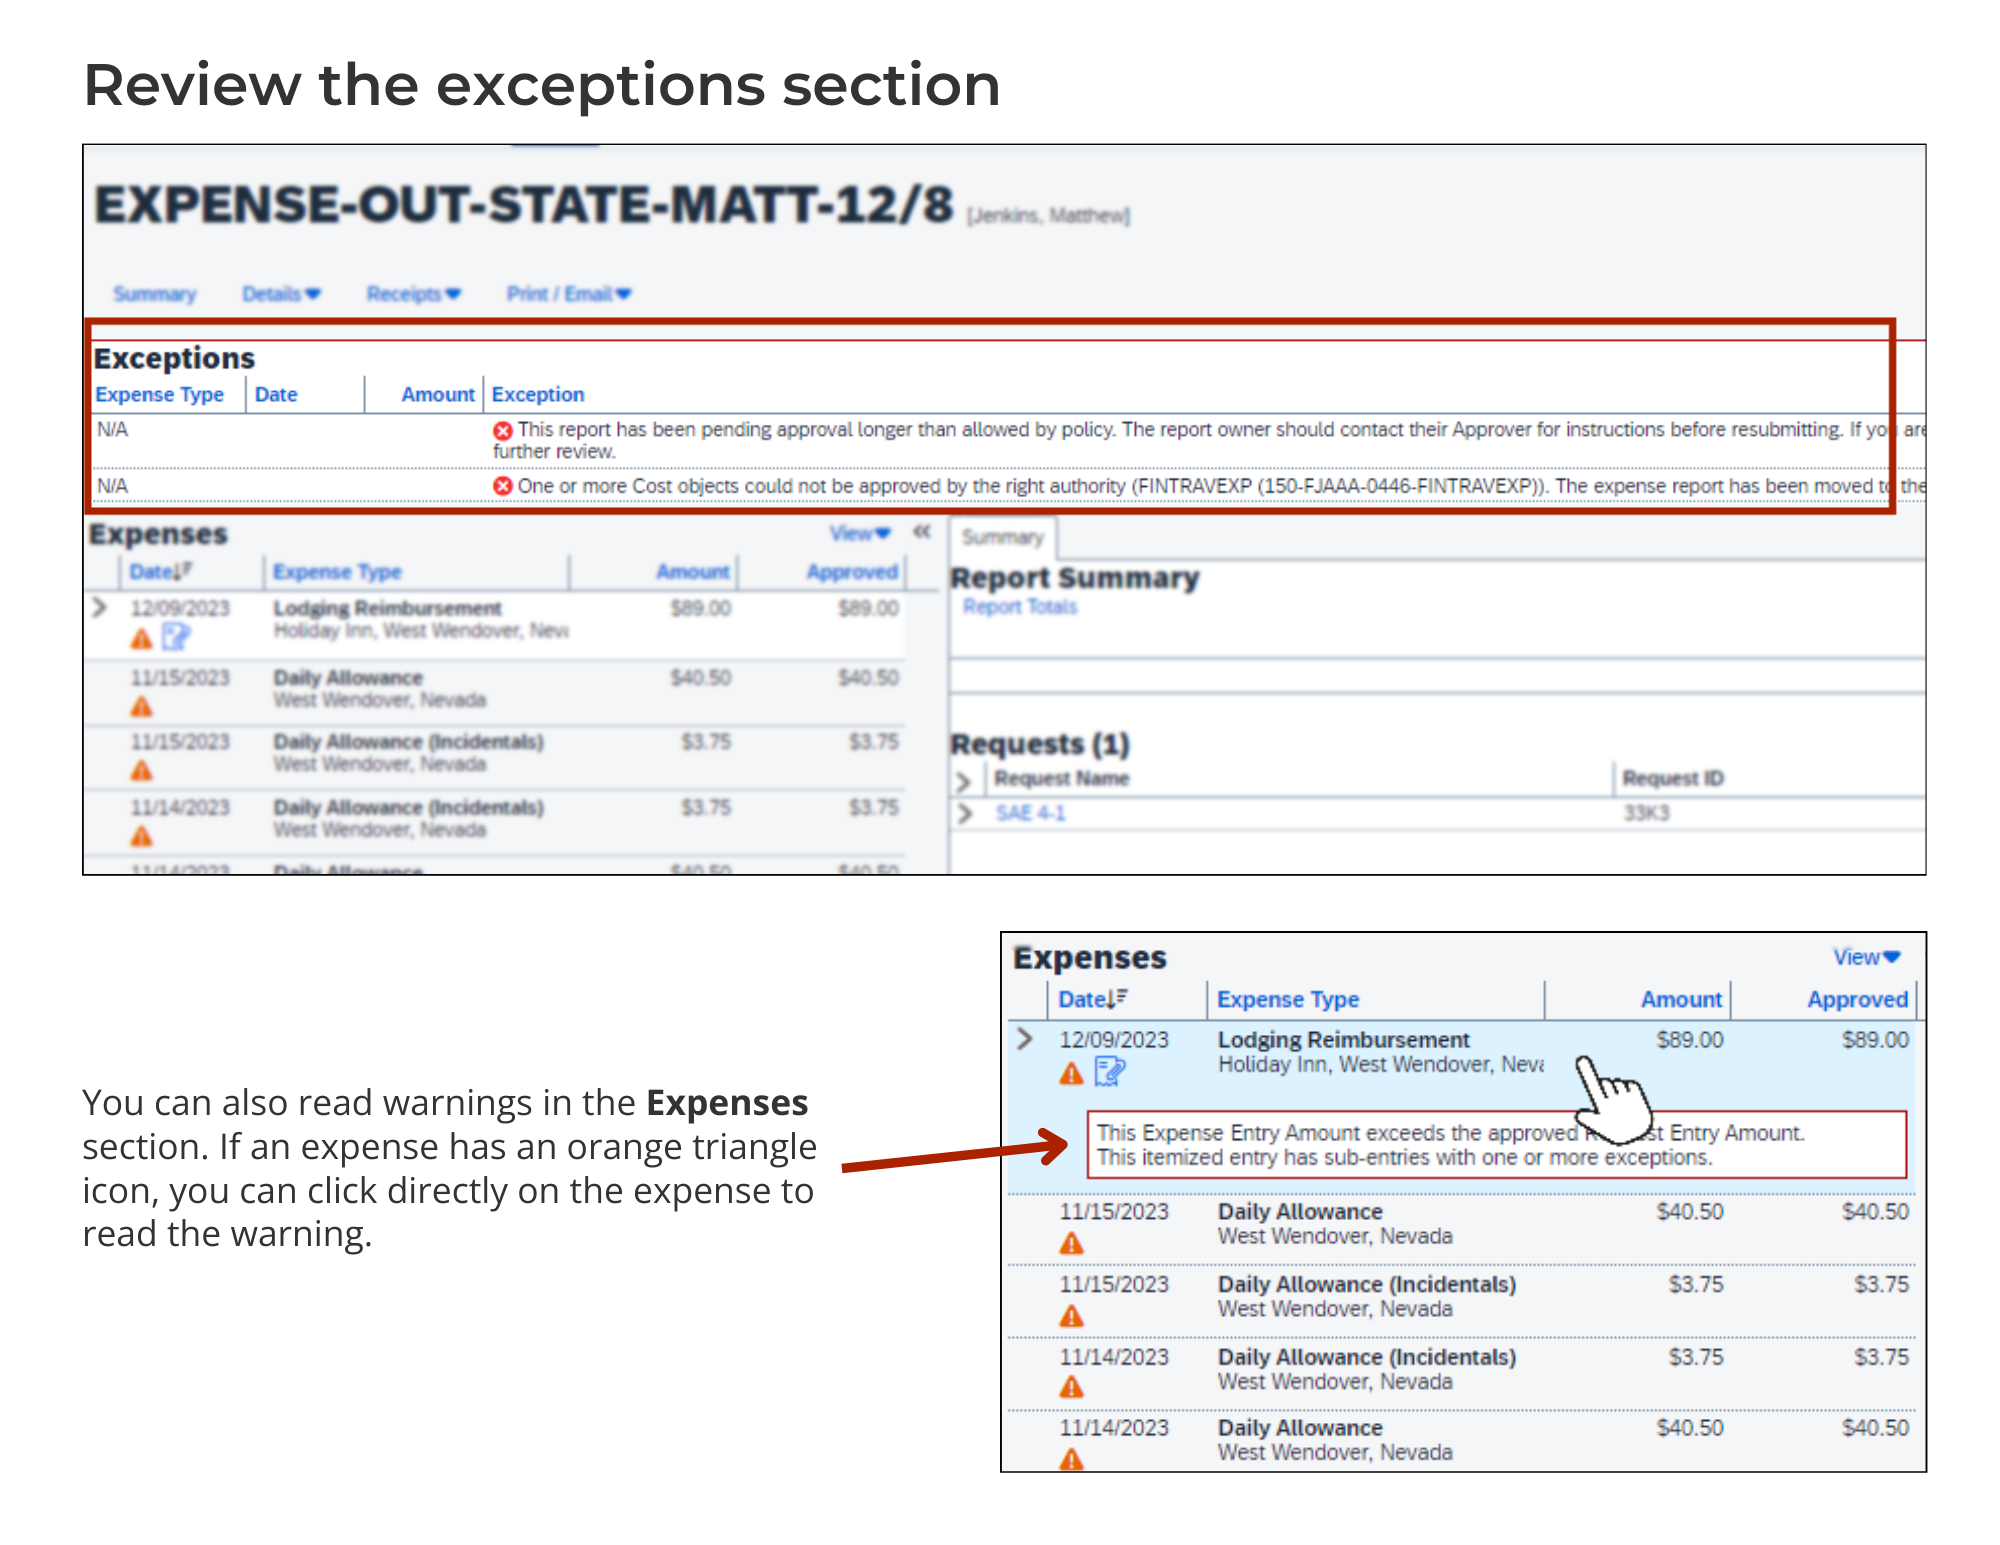
Review the exceptions section
Read the warnings and errors listed in the Exceptions section.
Alerts
Alerts are shown with an orange triangle icon. Alerts give information about policy to help you know what to look out for in the request. For example, you might see the warning, “Mileage between the home address and primary work address is considered a commute and commute mileage cannot be claimed.” This means the traveler added a personal mileage expense, so the alert is just a reminder for you to double check their mileage calculator to make sure they didn’t request reimbursement for a commute.
Errors
Errors are shown with a red circle icon. In reimbursement requests that are going through the approval process, errors give information about approvers. For example, you might see the error, "One or more cost objects could not be approved by the right authority..." This means that the budget officer didn't approve the reimbursement request in time and it was bumped to the next approver in the process.
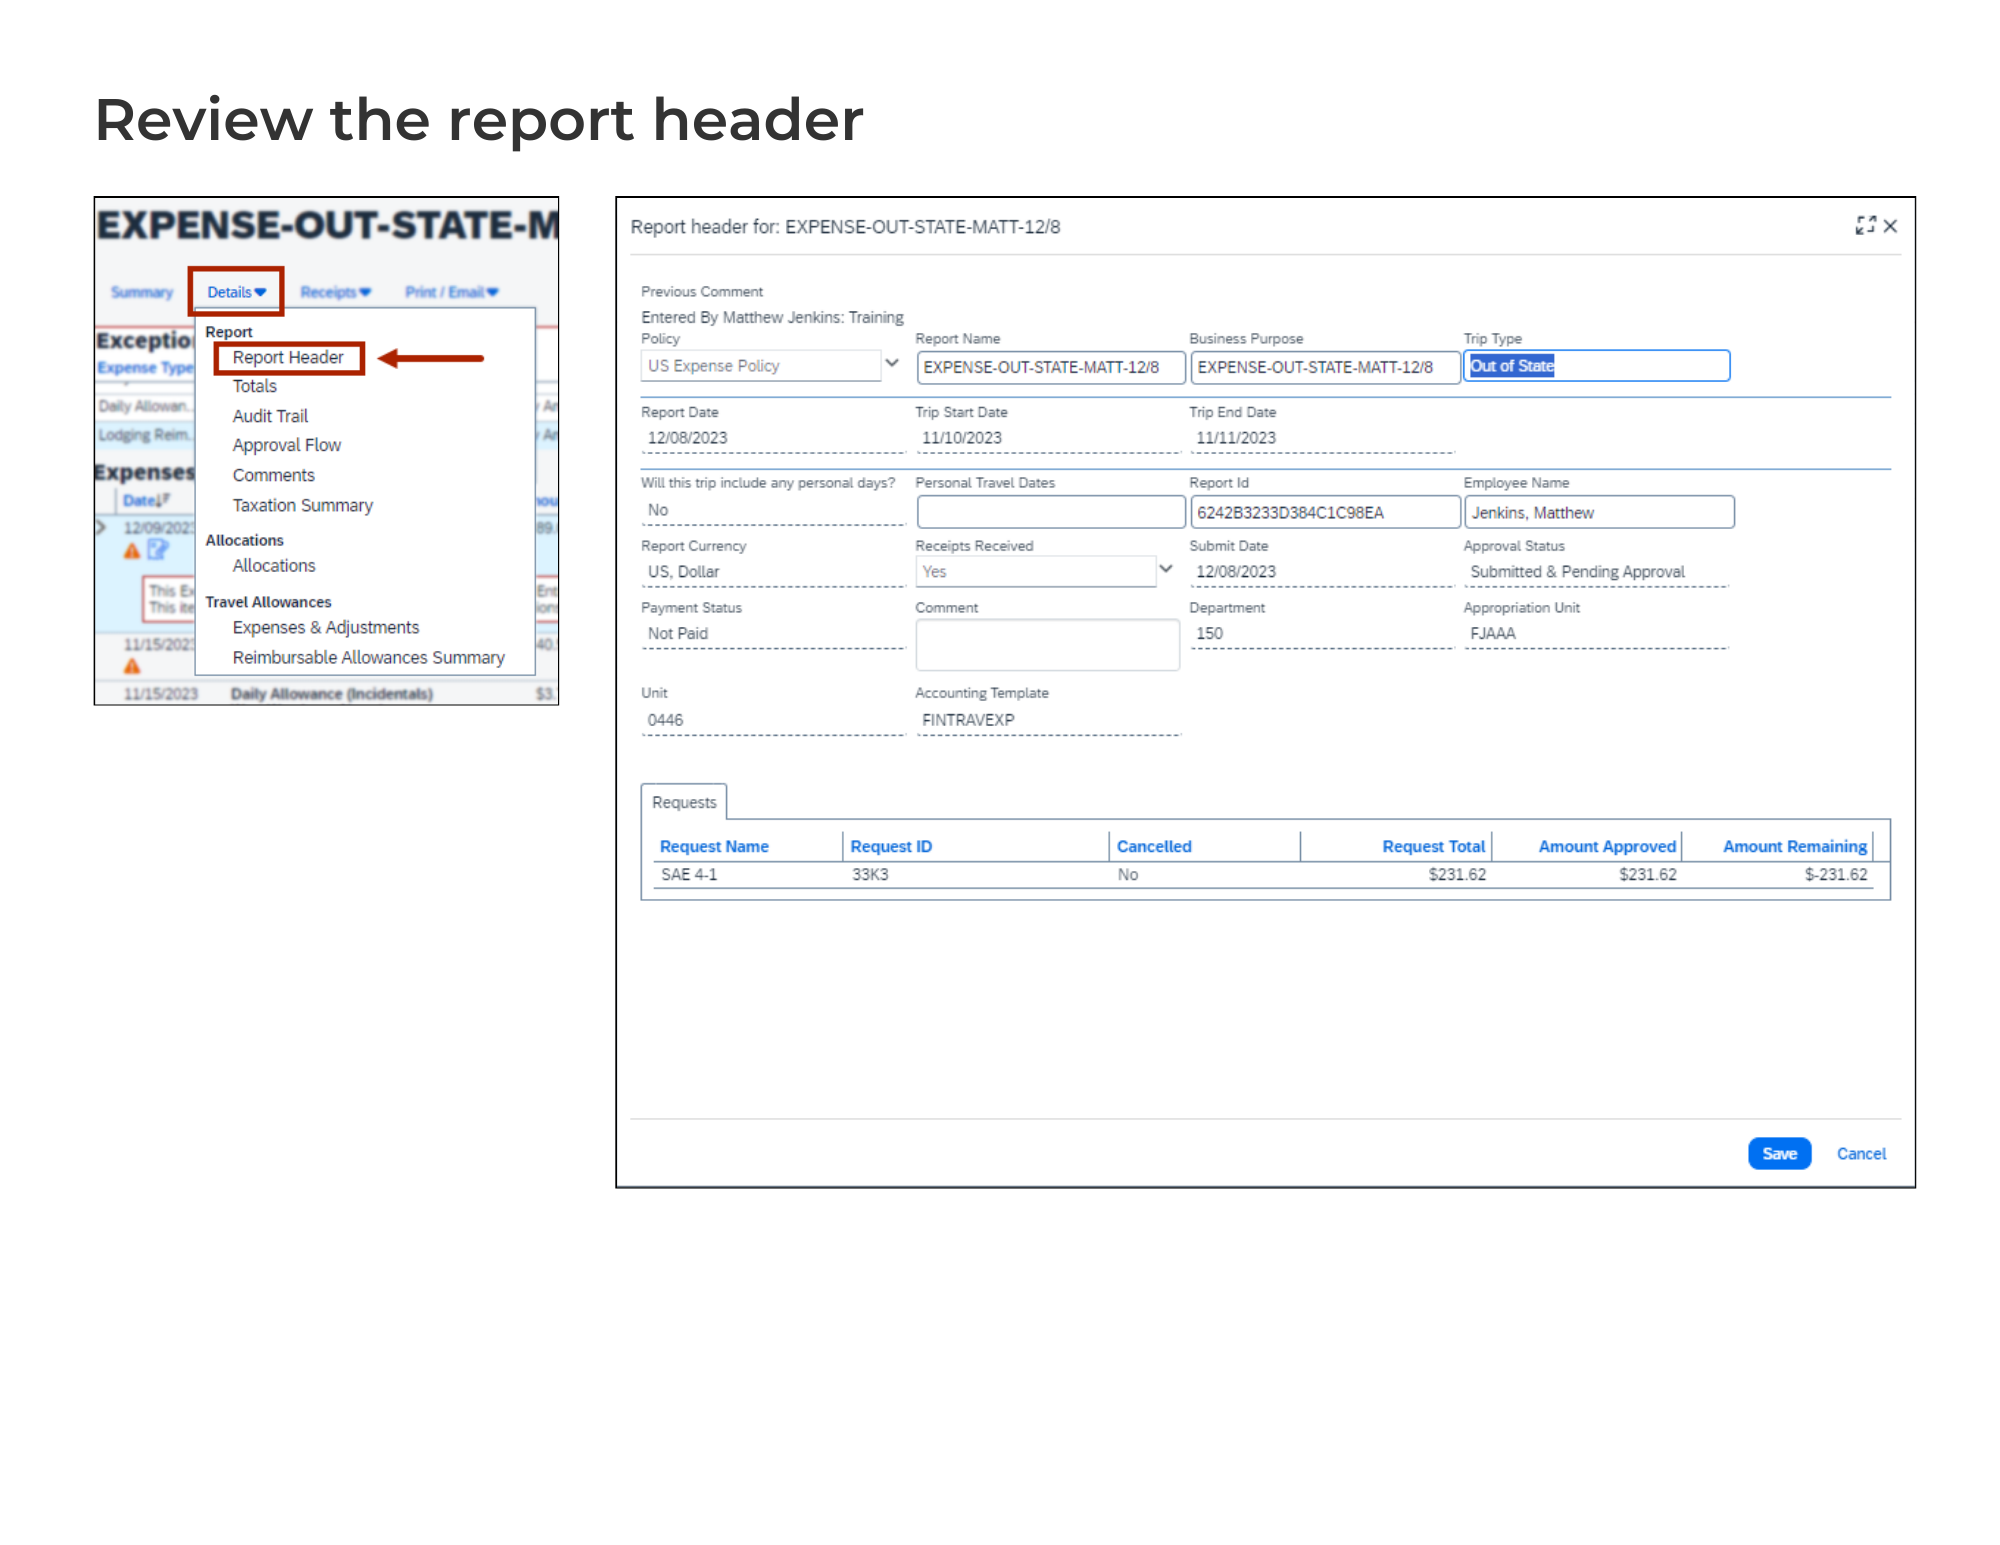
Review the report header
Click Details > Report Header.
Review all the fields in the report header to make sure everything is filled in correctly. If you’re a budget officer, make sure the appropriation unit, unit, and accounting template are correct. If you’re not sure, ask your supervisor.
When you’re done reviewing the report header, click the blue button Save in the bottom-right corner of the window.
Read all comments
You can read all comments in one window, or you can read comments individually on each expense. Choose whichever option works best for you.
Read all comments in one window
Click Details > Comments.
In the Comment History window, you can also add comments about the reimbursement request. For example, if you asked the traveler for more information about an expense, you could leave a comment explaining more about that expense so the other approvers don’t need to ask the traveler the same question.
Read comments individually
Find expenses marked with a blue message icon under the Expenses section and hover over the icon. If you want to add a comment to the expense, click on the expense to see the details, and add your comment in the Comment field. Click Save.

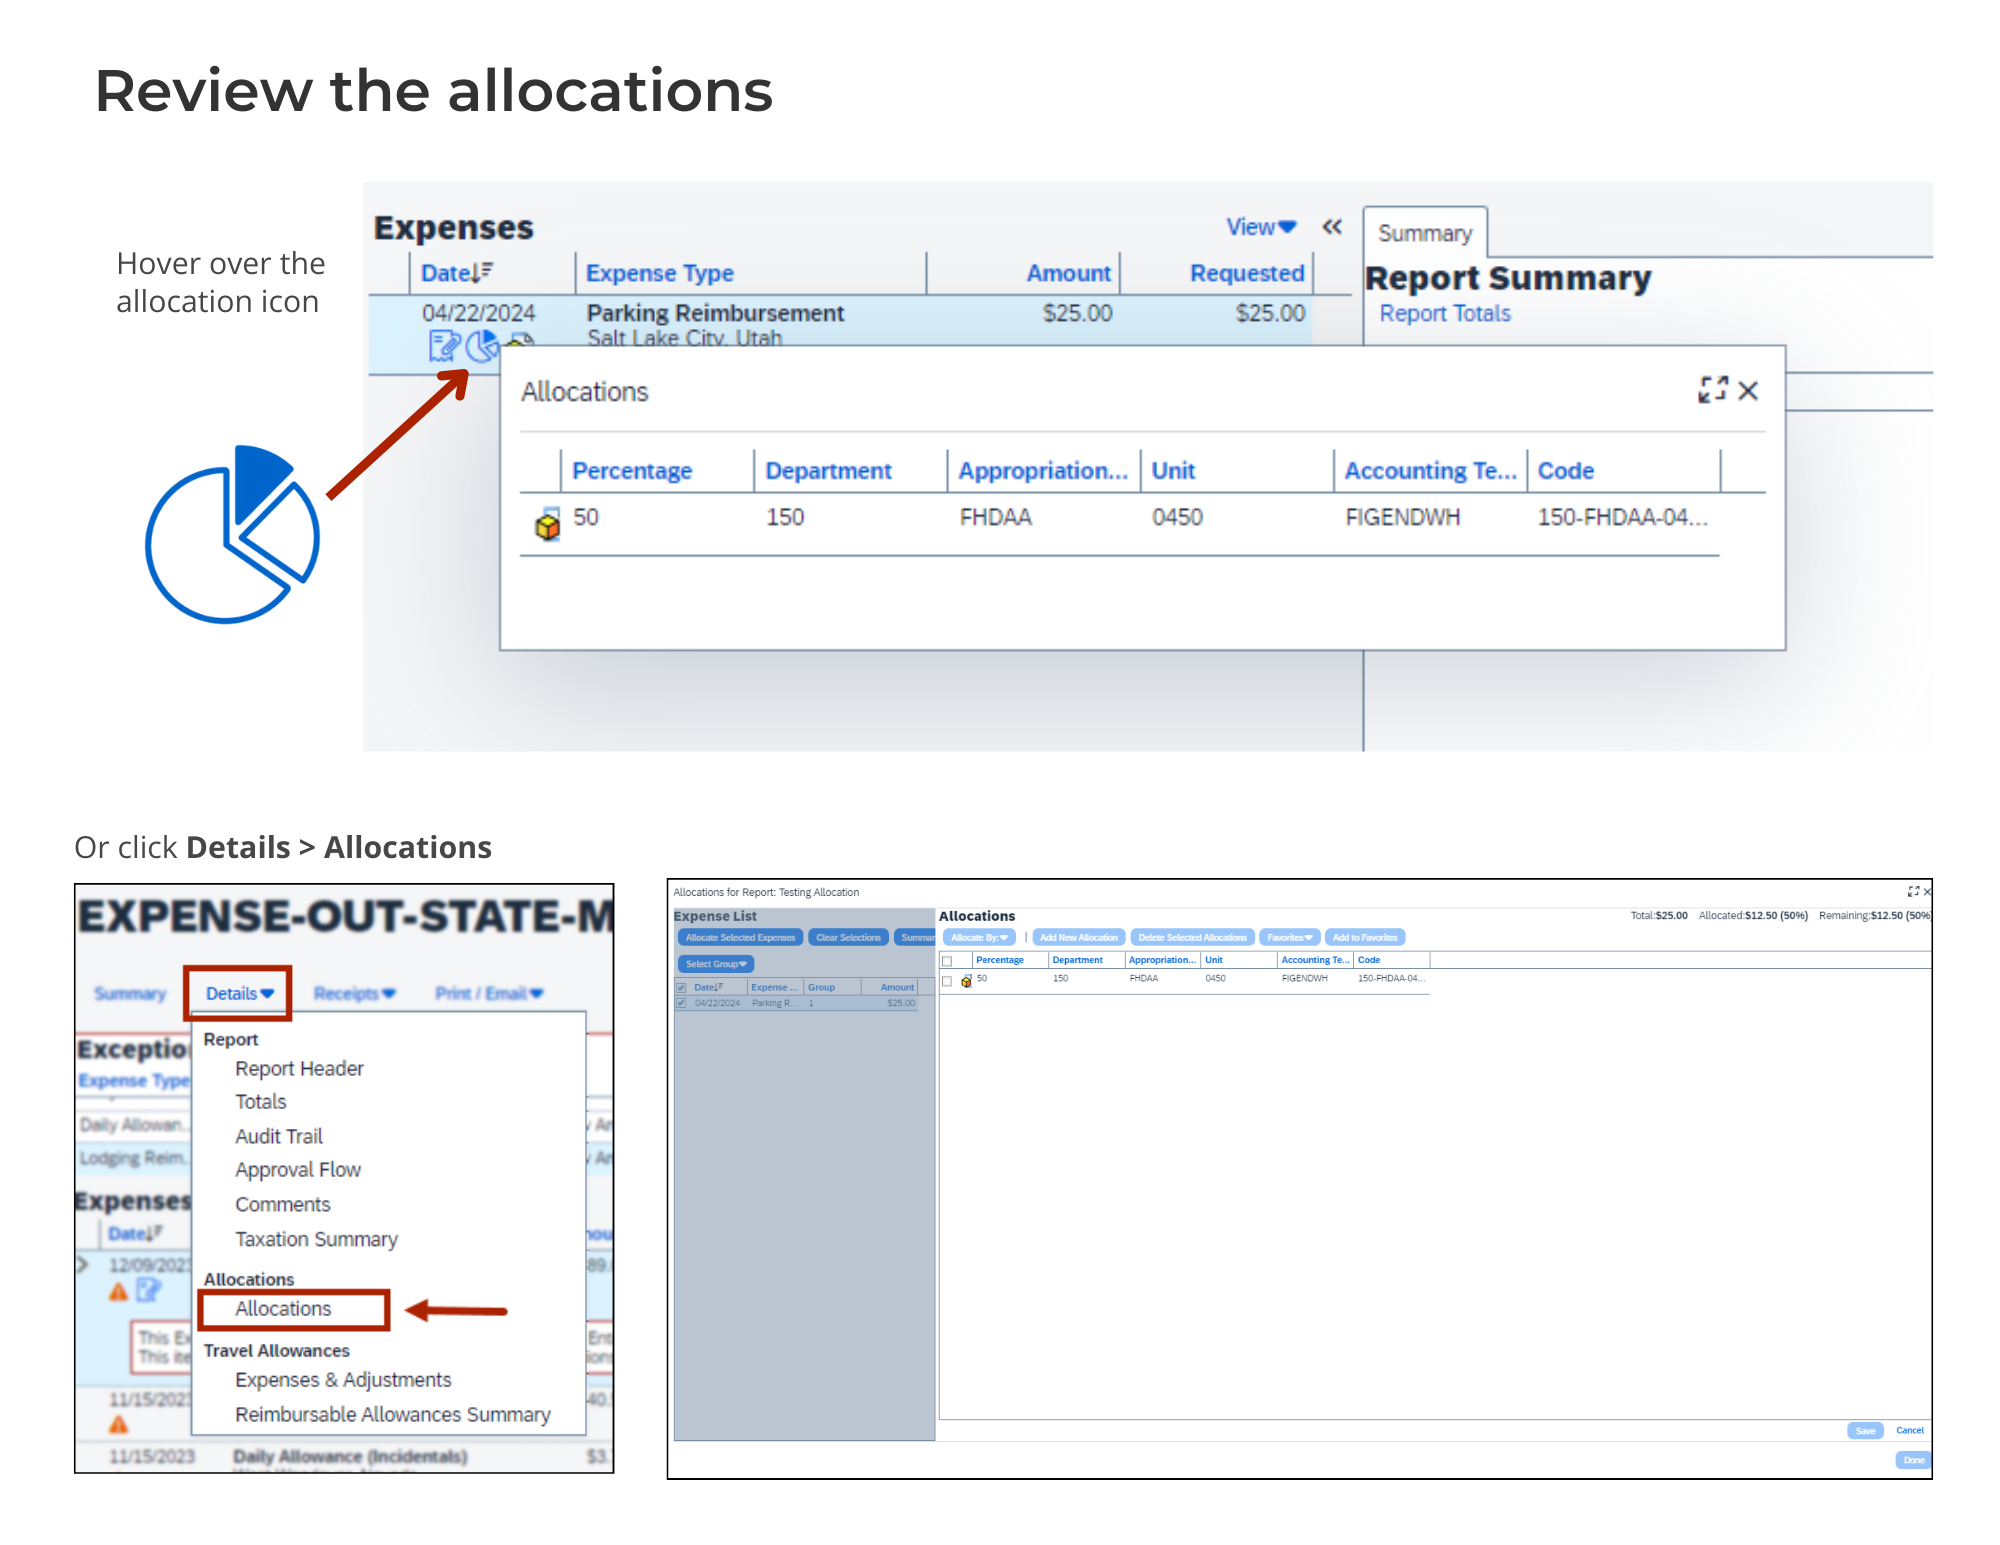
Review the allocations
In the Expenses section, hover over the allocation icon to make sure any allocated expenses were assigned to the right accounting template. If there are no allocation icons, then the default accounting template was used for every expense.
You can also see allocations by clicking Details > Allocations
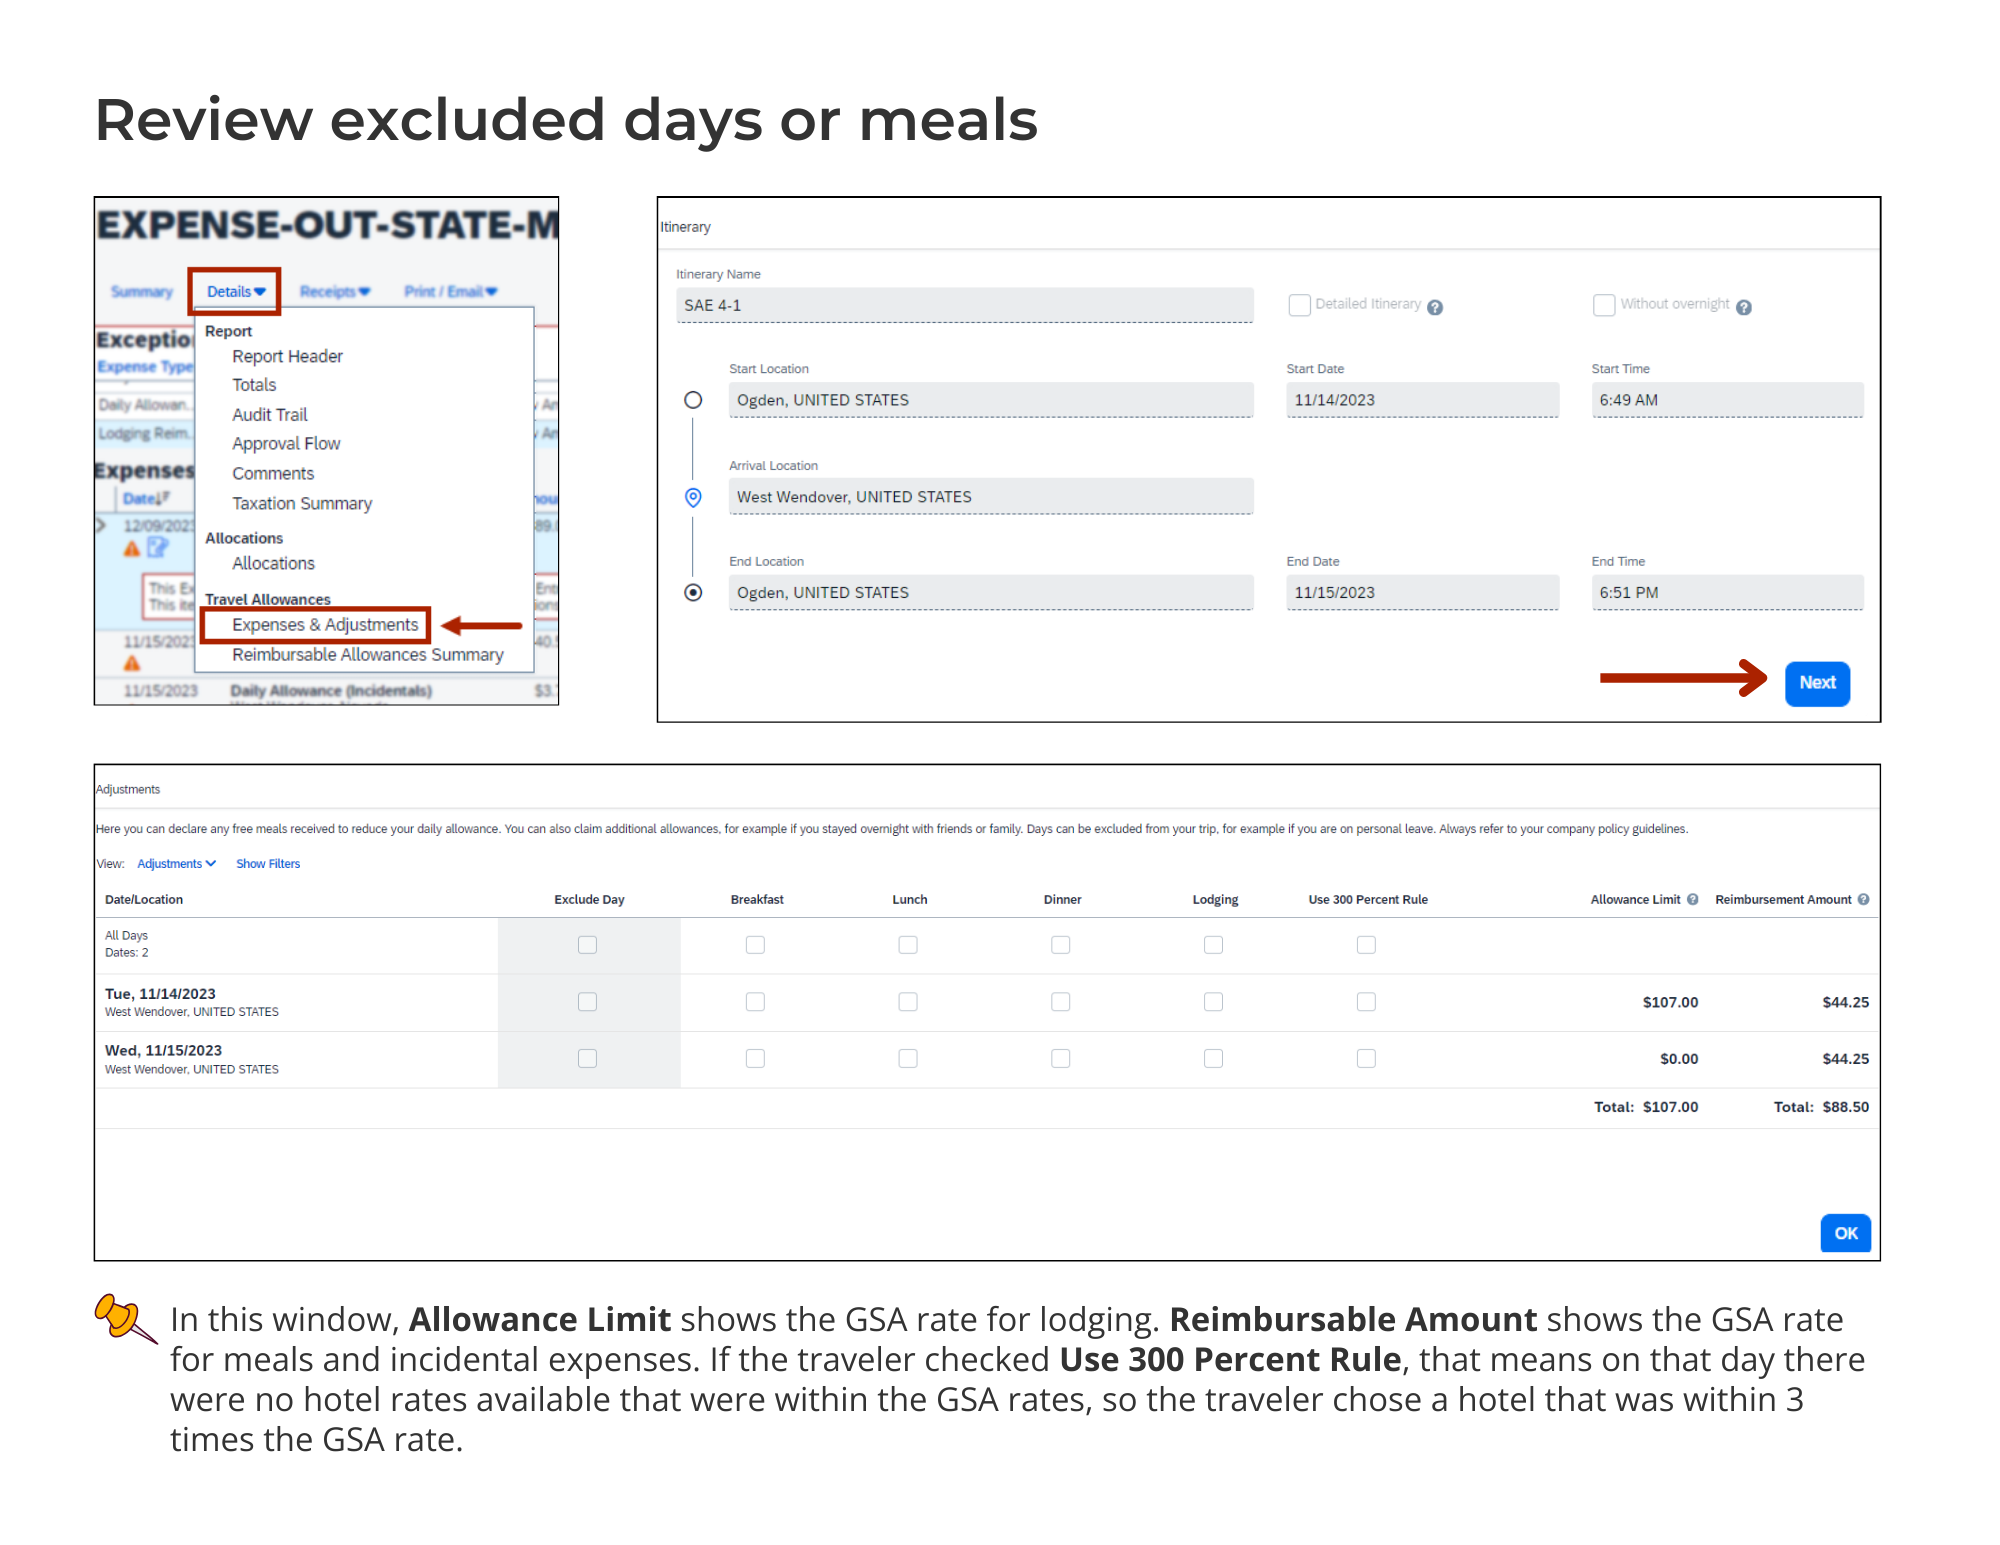
Review excluded days or meals
Double check that the traveler excluded any days or meals needed.
Click Details > Expenses & Adjustments
The Itinerary window shows the traveler’s itinerary: start and end locations and start and end dates. Click Next.
The Adjustments window shows any meals or lodging the traveler excluded from their reimbursement request.
Travelers can’t be reimbursed for personal days or complimentary meals. For example, if a traveler added 3 personal days to their trip, then the box Exclude Day should be selected for those 3 personal days on their reimbursement request. Or if the traveler stayed in a hotel that offers a free hot breakfast, then the box under Breakfast should be selected for each day of their trip.
When you’re done reviewing the Adjustments window, click OK in the bottom-right corner of the window.
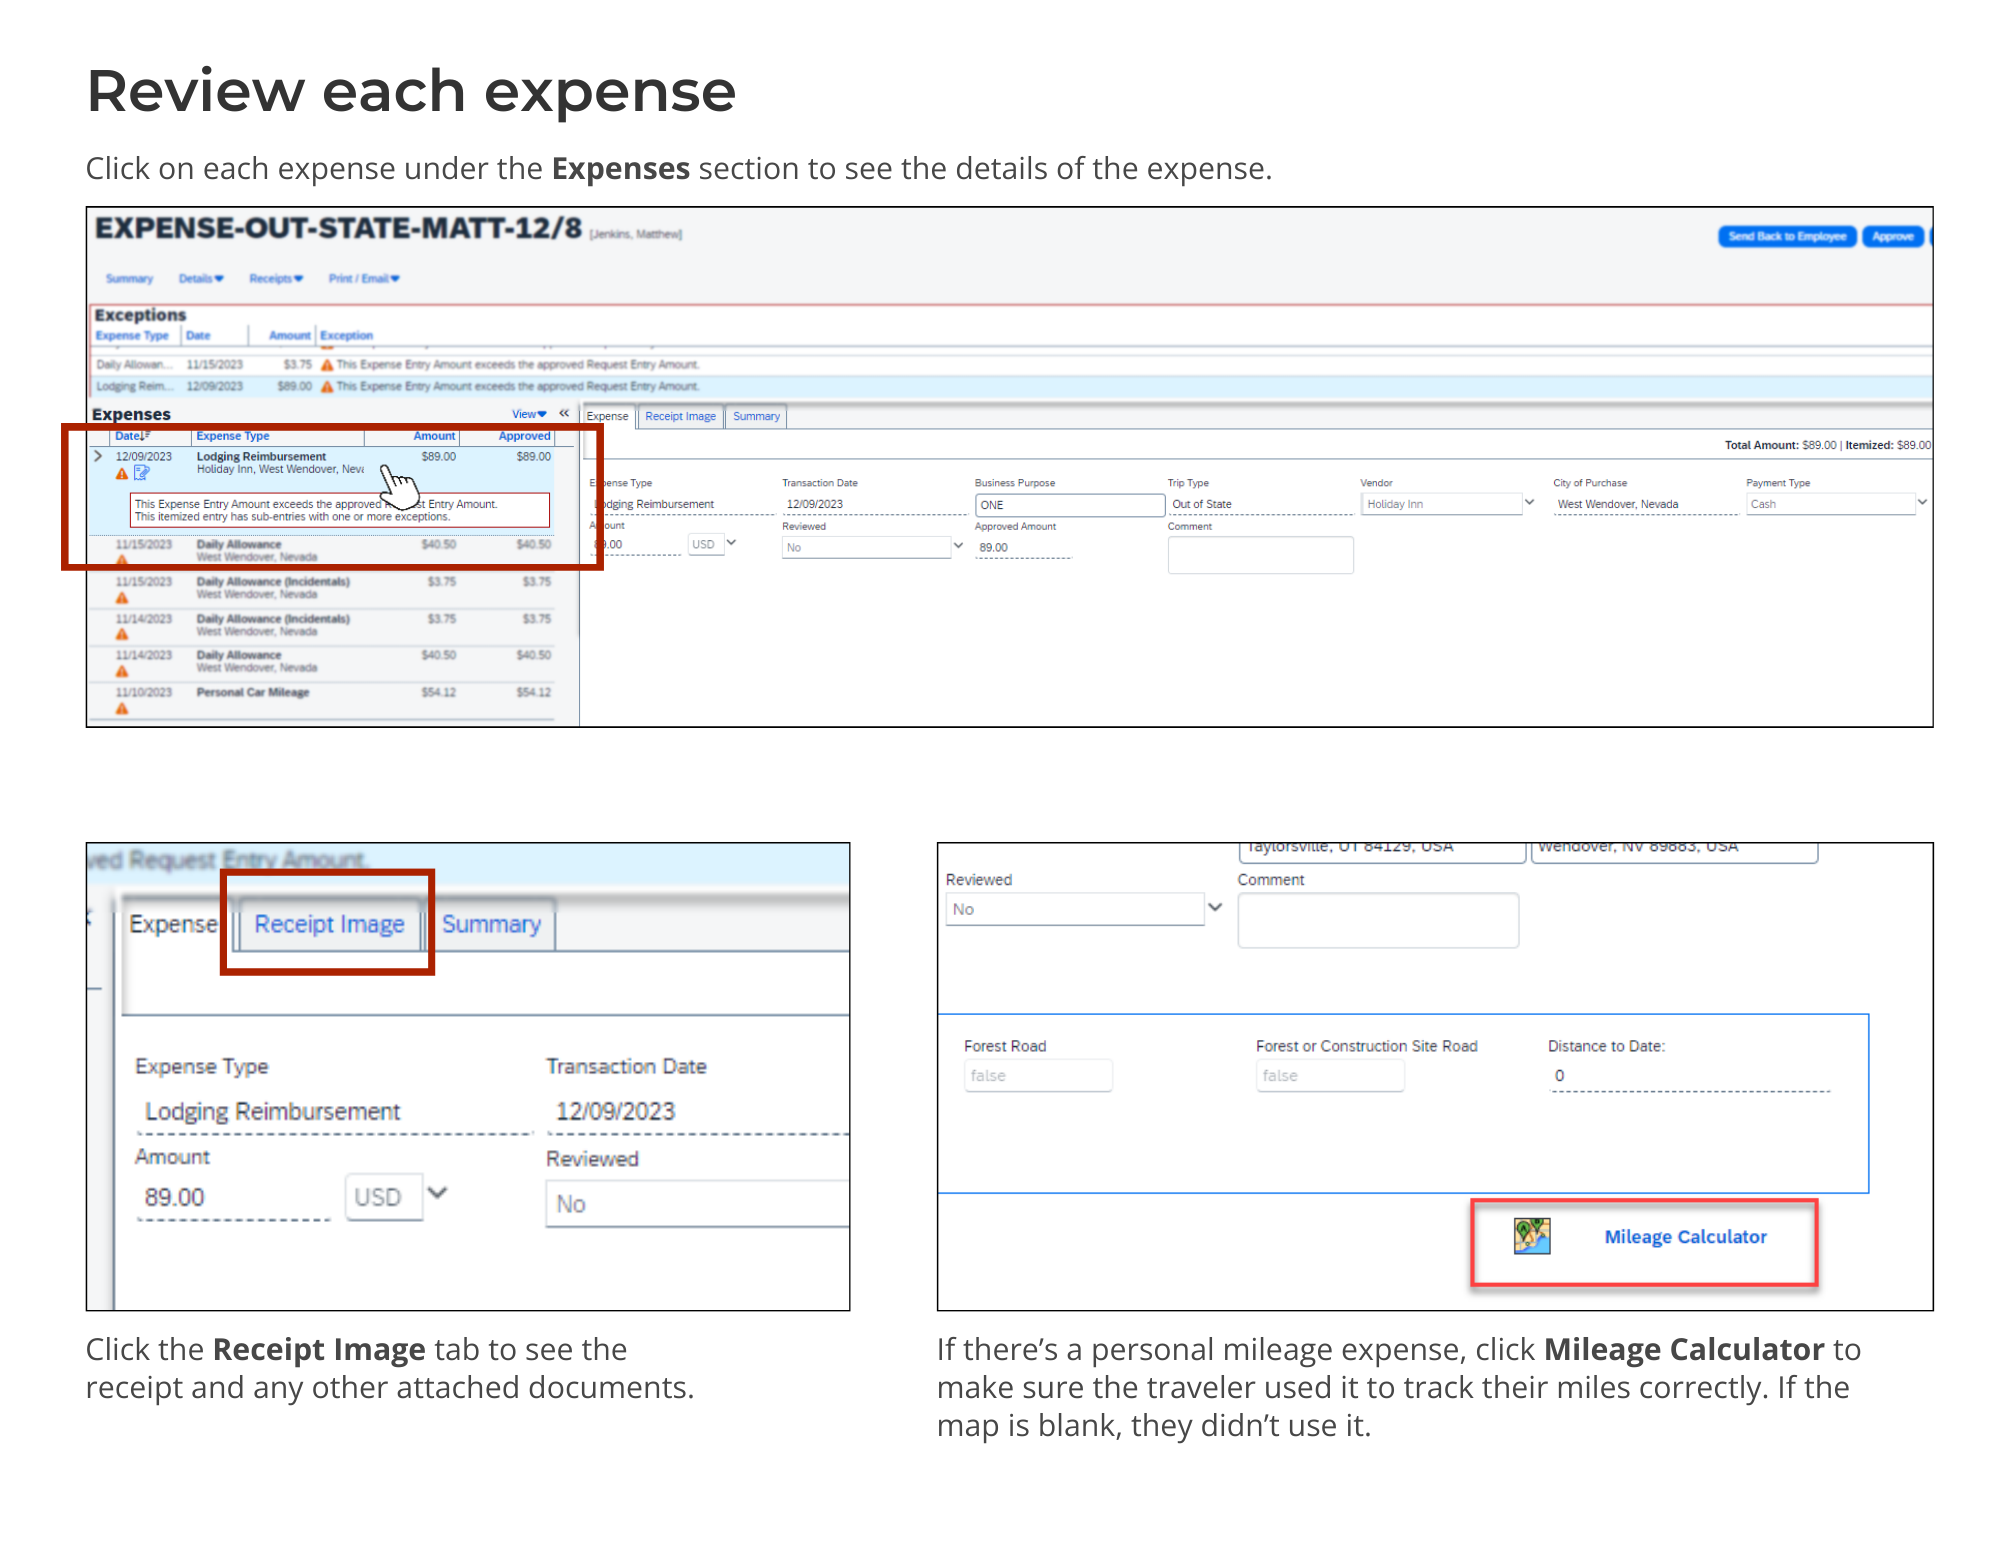
Review each expense
On the approvals summary page, click on each expense under the Expenses section to see more details about each expense.
Make sure the label on each expense is correct. For example, if the expense is labeled “Lodging reimbursement,” check the attached documents to make sure they show lodging information and not parking information.
Make sure the information on the attached receipt matches what was entered in Concur.
Make sure any additional documentation is attached. For example, if the traveler included personal days on their trip, they need to attach a cost comparison to their airfare expense. Or if a traveler attended a conference, they need to attach conference materials like an agenda to their conference registration expense.
If there’s a personal mileage expense, make sure the traveler calculated their miles using the mileage calculator. Click Mileage Calculator. A window with a map will appear. If the map is empty, the traveler didn’t use the mileage calculator.
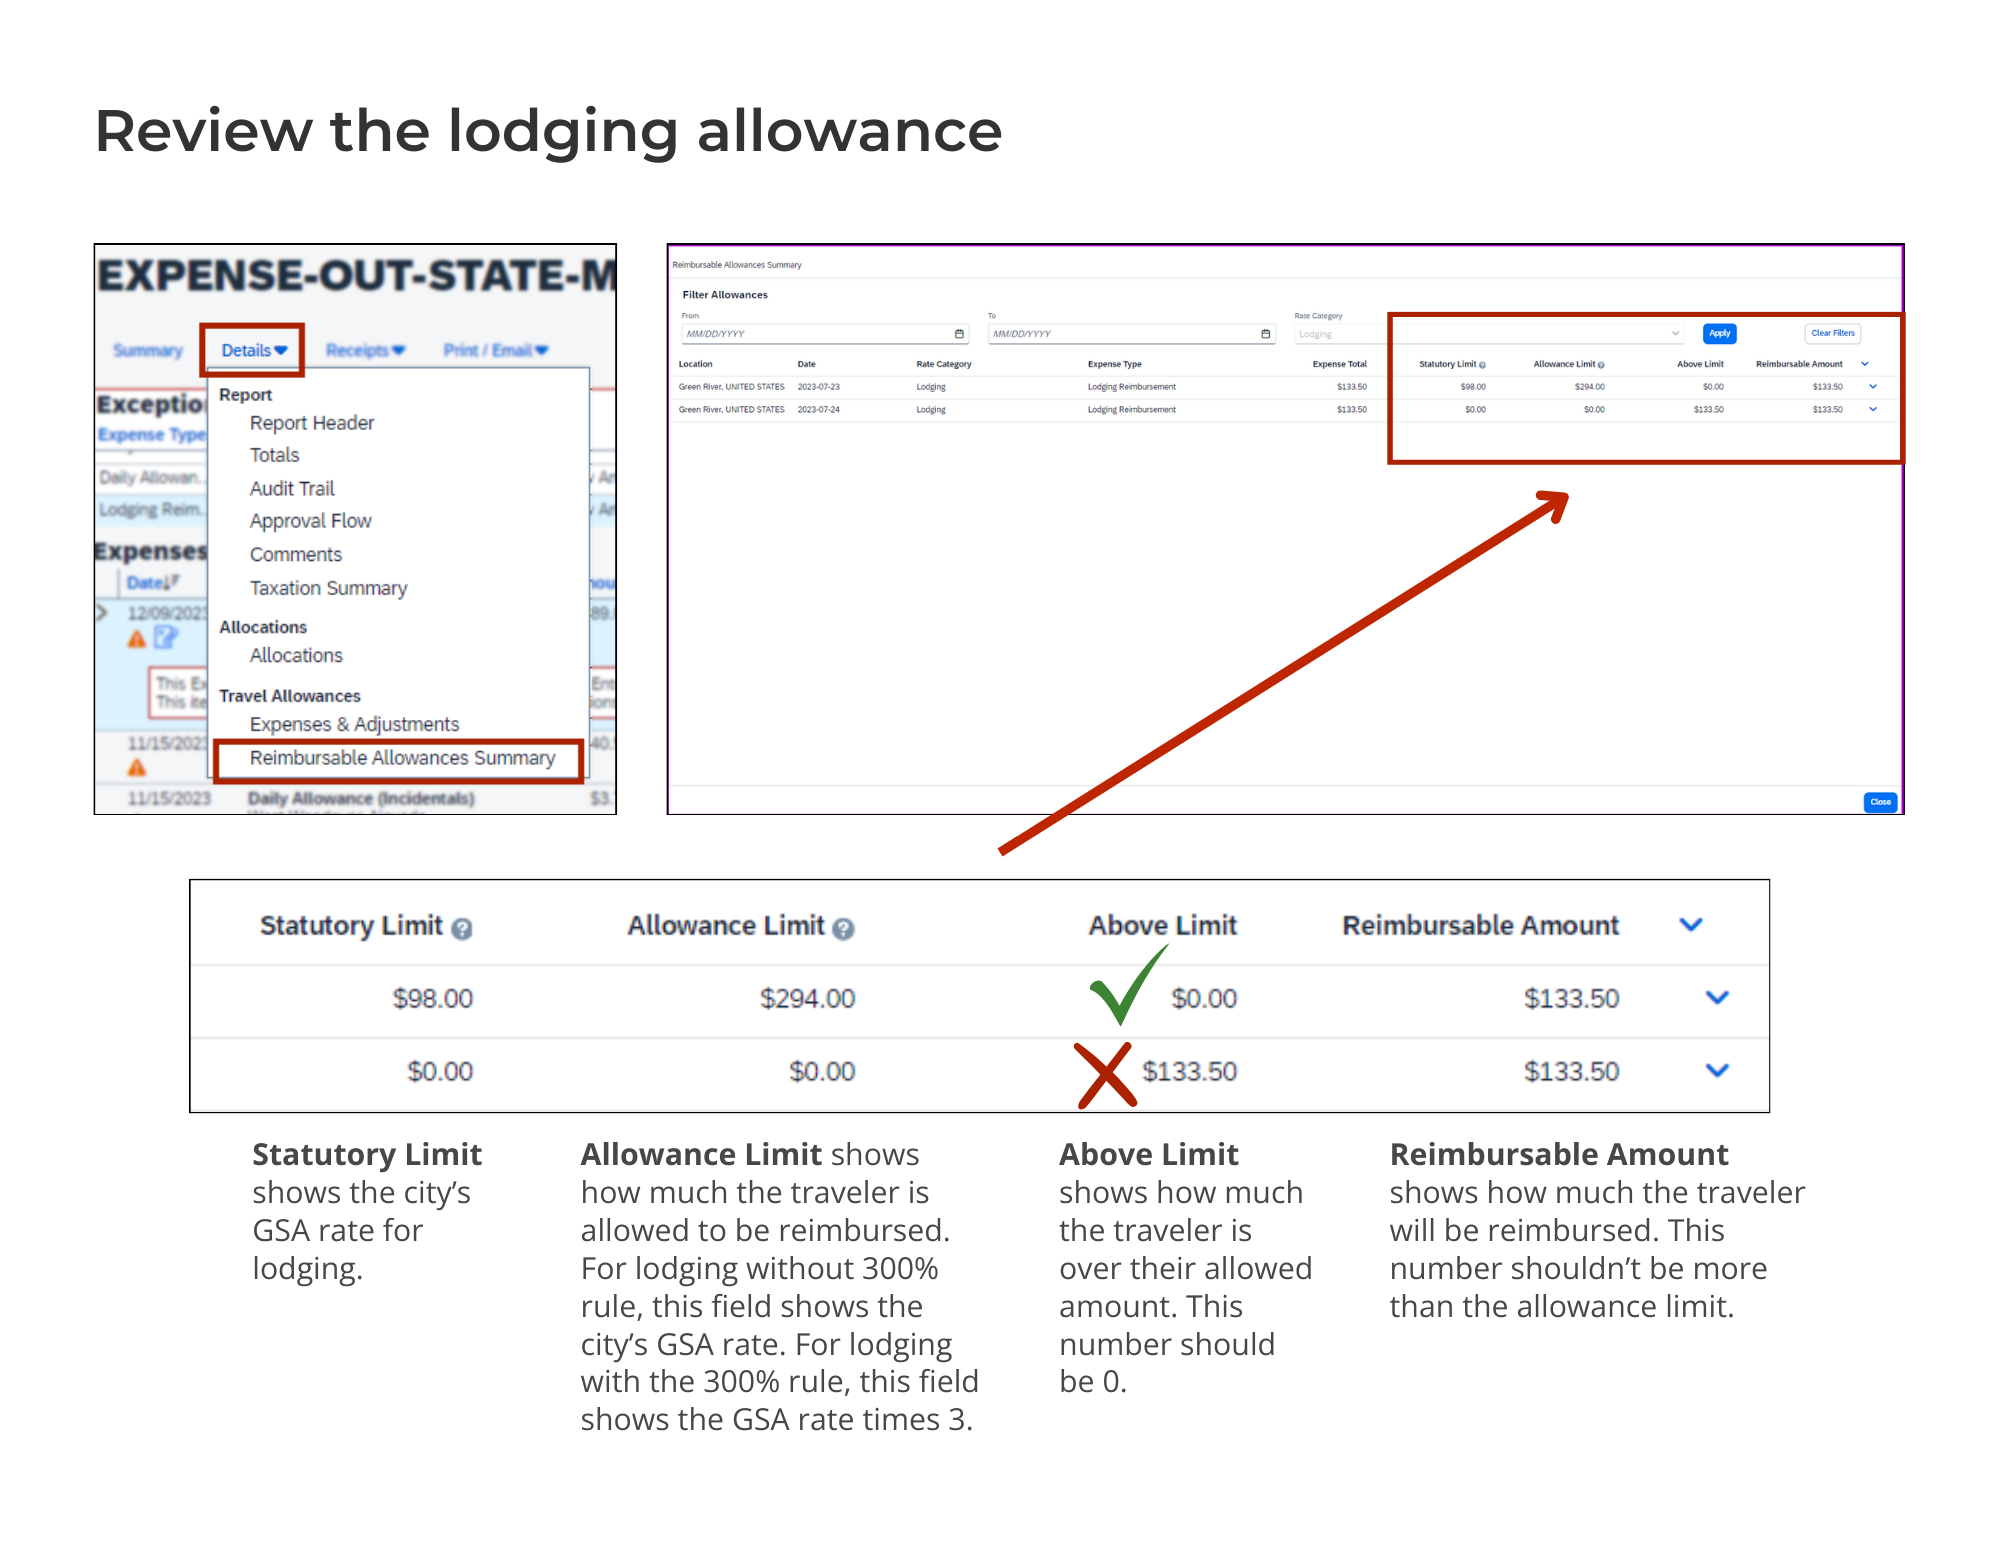
Review the lodging allowance
Click Details > Reimbursable Allowances Summary
The Reimbursable Allowances Summary window shows the GSA rate for lodging and how much the traveler will be reimbursed. The Allowance Limit shows how much the traveler is allowed to be reimbursed. If the traveler didn’t use the 300% rule, then the allowance limit will list the city’s GSA rate. If the traveler used the 300% rule, the allowance limit will show the city’s GSA rate times 3. Above Limit shows if the traveler’s reimbursement is over the allowed amount. The Reimbursable Amount shows how much the traveler will be reimbursed.
Whether the traveler used the 300% rule or not, the number under Above Limit should be 0. And the Reimbursable Amount shouldn’t be higher than the Allowance Limit.
Other details you can check
Click Details > Audit Trail to see the actions taken on the request. For example, who has approved it, if an approver missed their deadline, and if it was automatically bumped to the next approver.
Click Details > Approval Flow to who has approved the request so far.
Click Details > Totals to see the total amount the traveler is asking to be reimbursed. The field Amount Due Employee shows how much the traveler will be reimbursed if you approve this request. If the traveler requested a cash advance, you’ll see the amount of the cash advance in this window too.
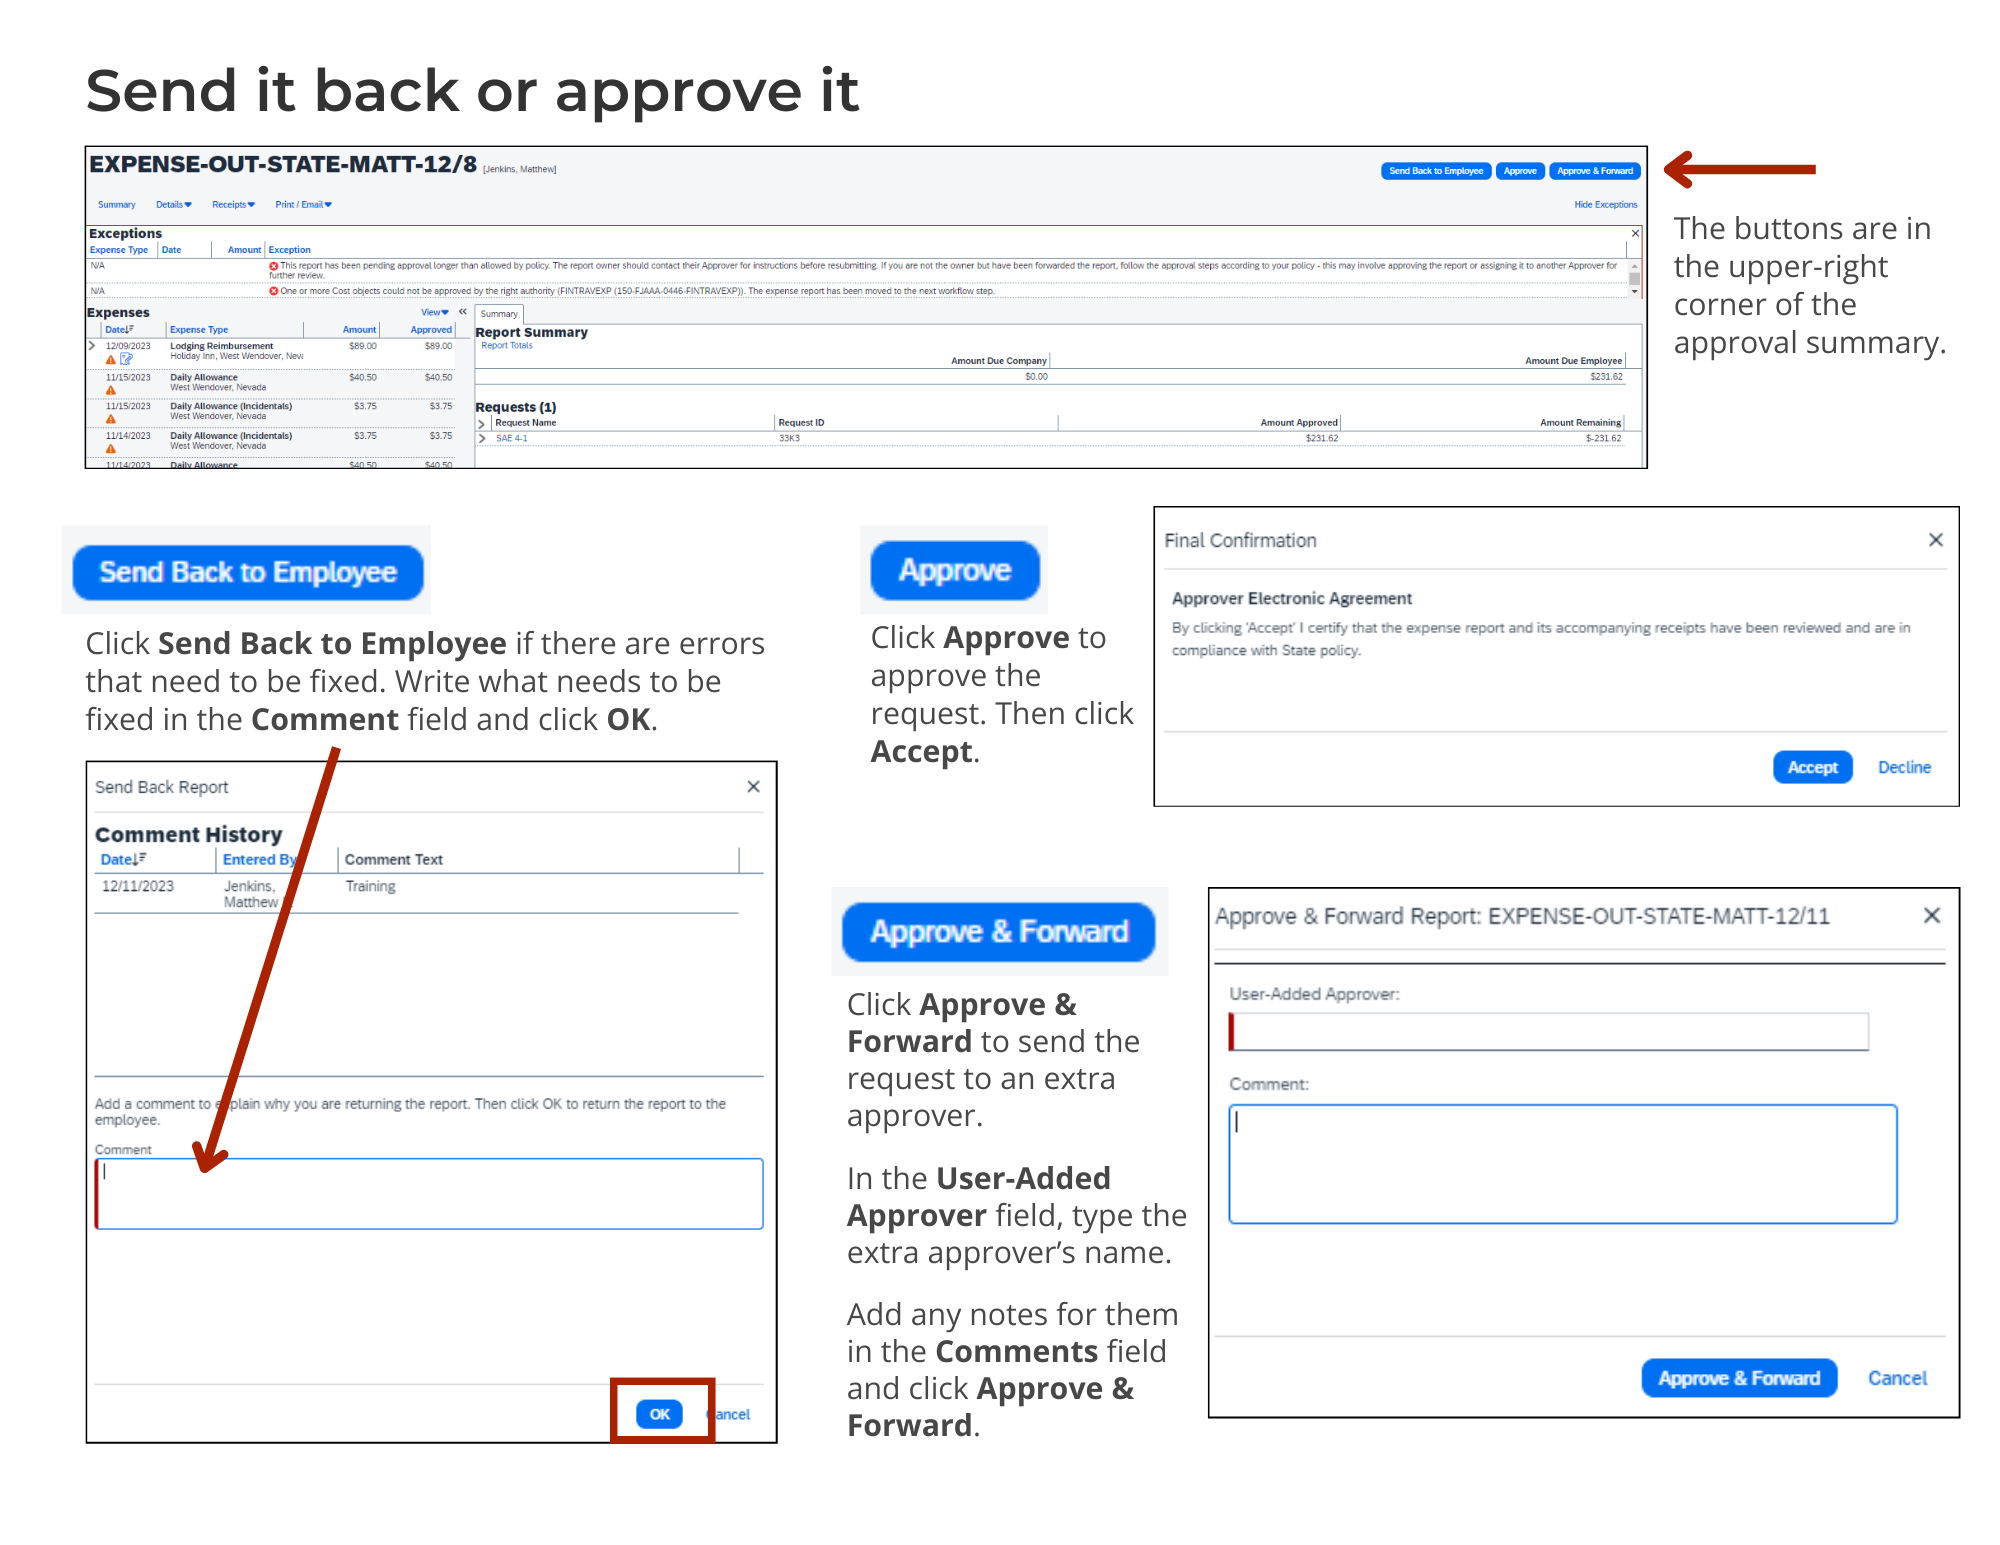
Send it back or approve it
If you found any errors in the reimbursement request, send it back to the traveler with comments detailing what needs to be fixed. From the approvals summary page, click Send Back to Employee. The Send Back Report window will open where you can write what the traveler needs to change. Click OK. Once the traveler resubmits their reimbursement request, the approval process will start over again with the first approver.
If there are no errors and the expenses requested for reimbursement followed travel policy, it's time to approve!
Click Approve. You’ll see a Final Confirmation window asking you to certify that the request complies with policy. Click Accept. The request will move to the next approver, or if you're the last approver, the request will be submitted and processed. The traveler will be paid in 7 business days through electronic transfer.
Some approvers have the option Approve & Forward, which allows you to approve the request and then forward it to an extra approver. This new approver will have 7 days to approve the request before it’s sent to the next approver in the process.
Assign a delegate to approve for you
If you assign a delegate to approve for you, your delegate must have similar job responsibilities as you. For example, if you’re a supervisor, your delegate must also be a supervisor or someone with similar responsibilities. If you’re a division director, your delegate should be a deputy director or someone similar to a deputy director. To learn how to assign a delegate, visit our Concur help page.